
Yay! I finally finished writing up my first pattern! Whew, translating even a simple pattern from Claire-crochet-shorthand babble to a sensible plan is tedious work. Hopefully with time it'll get faster. Does that mean I should make more patterns?
I got the idea, out of boredom, a while back to use up some of my basketful of yarn scraps and make it into a colourful Ami, which produced ScrapCat! The first one was Pheobe.
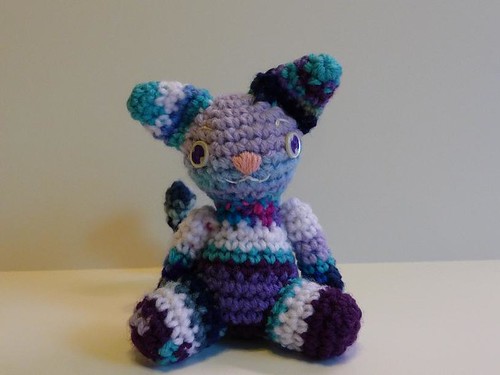
She's watching me from above my computer. Along with Groucho, the second Cat I made (So named for his abnormal dark eyebrows)
The rest are on my Flickr page, http://www.flickr.com/photos/carouselcute/
Their messy look just makes them cuter, I think. Each one is different thanks to different scraps used to make them, so their unique personalities can be endless.
If you find any errors or run into any problems, I'd be happy if you commented or emailed me. This is the first one I've ever written up for other people to follow, so I hope I did a good job!
Here you go!
***
Scrap Cat Pattern
A free pattern to make, with love!
This pattern is free for making, giving, sharing, selling the products of, etc. I only ask that you let me know when you sell things from it, and don't claim it as your own.
A free pattern to make, with love!
This pattern is free for making, giving, sharing, selling the products of, etc. I only ask that you let me know when you sell things from it, and don't claim it as your own.
MATERIALS:
G hook (H can work, but G is better for tightness)
Worsted weight yarn scraps. A good three handfuls, each scrap 5 inches or more is allright. You can use non-scrap yarn, too. That's just an approximation, so don't be afraid to use other yarn you may have.
Polyfil*
Embroidery floss
Needle (and yarn needle, obviously)
Pipecleaner (optional)
2 buttons for the eyes. Or use your respective eyes. I like buttons for them because it suits the scrappy feel.
*If you REALLY want to be thrifty, just stuff it with more scraps!
TERMS
ch-chain
st-stitch
sc-single crochet
inc-increase (2 single crochet in one sitch)
dec-decrease (single crochet 2 stitches together) (invisible decrease is best, and easy to learn with tutorials online. Planet June and Gourmet Amigurumi have good ones.)
ch-chain
st-stitch
sc-single crochet
inc-increase (2 single crochet in one sitch)
dec-decrease (single crochet 2 stitches together) (invisible decrease is best, and easy to learn with tutorials online. Planet June and Gourmet Amigurumi have good ones.)
BEFORE YOU START.
There should be a good two to three handfuls of scraps. Anything longer than 5 inches is allright. Note that shorter scraps will only show a few stitches, and longer ones will show much more. To obtain the "scrap yarn", take two strands and place them end to end, and tie a 2-strand overhand knot as close as possible to the ends (leaving a little bit of tail). Pull tight to make sure it won't slip out. Repeat as you go so that your scraps form yarn just enough length to work with. Remember to leave a good amount for sewing the piece to the body! A longer piece there is best.
The knots won't show through your crochet. If, when you make a stitch, they're showing on that side, tighten it or pop it through to the other side. Undoing the stitch and making it again only tighter can solve the problem too.
I realize this might be kind of a weird way to work, so if there's any problems or you have any trouble, just email me and I'll be happy to help!
PATTERN
This is worked as Amigurumi. Do not join rounds, work in a spiral instead. You don't have to do it in this order, but I make notes along the way as to assembly, so it's probably a good idea. It's also easier to do some things before others.
Have fun!
HEAD
Make a magic ring with 6 stitches. (or CH2, and make 6sc in first ch if you don't know the magic ring technique)
r1: inc in each st (12)
r2: *1 sc in next st, inc in next st. repeat from * around (18)
r3: *1 sc in next 2 st, inc in next st. repeat from * around (24)
r4: sc in each st. (24)
r5-7: repeat r4. (24)
r8: *1 sc in next 2 st, 1 dec. repeat from * around (18)
r9: *1sc in next st, 1 dec. repeat from * around (12)
Fasten off and pull tail inside the head.
Stuff well.
FACE
Using embroidery floss, sew an upside down triangular nose and mouth onto the middle of the face. Sew the buttons on for the eyes along the same line as the nose. Using the same colour floss as for the mouth, sew semicircle eyebrows.
*a note about the eyes:
I loved the buttons but didn't like the way they looked in the end with the thread I sewed them on with. So I took fabric paint (also known as puffypaint, great stuff) and filled in the buttons, with white dots for the shine. You don't have to, it's just something I felt like doing.
EARS (make 2)
Magic ring with 6 st.
r1: 1 sc in each st. (6)
r2: *1 sc in next st, inc. repeat around. (9)
r3: 1 sc in each st. (9)
r4: *1 sc in next 2 st, inc. repeat from * around, (12)
(If you want longer, tall ears, do one more round of sc in each st, for a total of 12 sc)
Fasten off and leave long tails for sewing.
If you want, choose a solid colour for both ears (make sure you have enough!) and sew it onto one side of each ear, to make the inner ear colour.
Fold them flat and sew the ears onto the top of the head, bending the sides in slightly to create a concave effect.
BODY
Magic ring with 6 st.
r1: inc in each st (12)
r2: *1 sc in next st, inc in next st. repeat from * around (18)
r3: *1 sc in next 2 st, inc in next st. repeat from * around (24)
r4: sc in each st. (24)
r5: repeat r4.
r6: *1 sc in next 2 st, 1 dec. repeat from * around (18)
r7: sc in each st (18)
r8: repeat r7.
r9: *1sc in next st, 1 dec. repeat from * around (12)
r10: sc in each st (12)
r11: repeat r10.
Fasten off with long tail.
TAIL
Magic ring with 6 st.
r1: sc in each st (6)
r2-4: repeat r1.
r5: dec, sc in remaining 4 st (5)
r6: sc in each st (5)
r7-15: repeat r6.
Fasten off. Fold pipecleaner in half and push the folded end into the tail. There should be some still outside of the tail. Place the tail at the base of the body (where, when sitting, it will be sticking outward) and push the remaining end into the body and fold one end one way and the other end the opposite way, to anchor the pipecleaner in place.
Sew the tail onto the body.
Stuff the body completely, adding a penny or two to the bottom for weight, if desired (not necessary).
Now, sew the body to the head, making sure that you fasten it to where the tail is behind (and when looking down on it, between) the two ears.
ARMS (make 2)
Magic ring with 6 st.
r1: sc in each st. (6)
r2-9: repeat r1.
(this is when a stitch marker really comes in handy. You can use a paperclip or hook earring if you don't have one.)
Stuff.
Sew the opening closed by fastening off with a long tail, and threading the tail through the outer loop of each stitch and pulling closed.
LEGS (make 2)
Magic ring with 6 st.
r1: inc in each st (12)
r2: sc in each st (12)
r3-6: repeat r2
r1: inc in each st (12)
r2: sc in each st (12)
r3-6: repeat r2
Fasten off and stuff.
Sew to the body, each leg at an angle towards the front (not directly below the ears, but angled inward). Make sure it's at the base, same as the tail, so your ScrapCat can sit without falling over.
Sew the arms onto the body just below the neck.
For a Maneki ScrapCat (the raise-paw good luck cat), Sew the left arm on upwards. You can sew the paw down in a beckoning motion, and tack on a bell or fake coin as well.
That's all! It's finished! I hope you enjoyed this pattern and had fun with it!
If you have any questions, comments, or want to share your ScrapCat, just let me know!
AAAAH just when I was getting back into drawing you give me the possibility to learn ami. SOME AMI(E) YOU ARE *shot*
ReplyDeleteTHAT IS HORRIBLE. But I love you. And you should make one<3
ReplyDeleteEven if not made from scraps, they're still fun and easy.