Friday, September 23, 2011

... and we're back!

And better than ever!
After a long but fruitful haitus, wherein the author gets married and moves among other things, Carousel has returned with much to talk about!
You can count on updates every Monday, with posts on crafts and projects, crafty obsessions, patterns, pictures and more! Plus, I'll be revamping and filling a Carousel Etsy store with the products from everything! Old patterns are in the works of being written and updated, with many new patterns to come.

Nothing huge today, except to open to the topic of freezer paper stenciling. Even though I learned a lot of crafty things as a kid, I hadn't even heard of this until recently! For those who don't know, freezer paper stenciling is a technique where you take an image and reproduce it on cloth (tshirts, bags, etc) by ironing freezer paper with the design on, and paining in cut-out portions of it like a normal stencil. You can then rip the paper right off to reveal a clean-cut design!
Needless to say, I went nuts over this.
Strawberry Bunny
-My second shirt-
Not only have I been making all kinds of shirts, but I streamlined the process even more, because I have this weird need to do that sort of thing.
Maneki Neko
Chinese Dragon
-more designs I made up to play with-
Avatar Bender Elements
-Fanart shirts! The possibilities are ENDLESS, and you can get some really cool results-

So Monday I'll be dishing on that as well as posting some of my favourite resources!

Tomorrow, I'll be heading to our local Anchorage convention, Senshicon! It's a fantastic time, and I'm going to be having a booth there with loads of tshirts, raver kandi, manga, and art and tshirt commissions! It's a two day event, and always fun, so I can't wait :D

Sunday, November 28, 2010

Kickin'

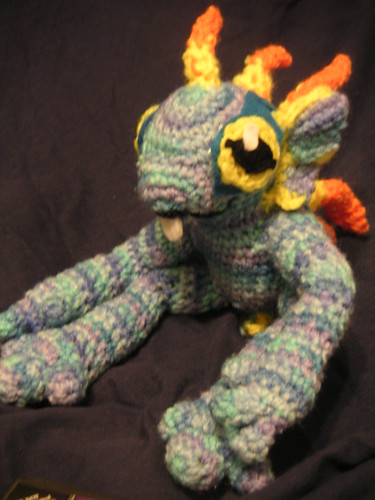
I'm still alive and still crocheting! I haven't blogged for these months mostly because I've been focusing on other things, like work and school. However I'm swinging back around to more crochet, to include writing up the pattern for my Murky!
Amigurumi Murky closeup
Yes, I am finally at the point where this is being worked on :D Updates to follow shortly.
In addition, We have a new addition to our little family! My fiancee and I got a puppy, a 2 month old rotty/doberman mix we named Taika, and she's just ridiculously adorable! A little dumb, but cute<3
I have other things I'll be posting as well. Since I kind of obsessivly craft all different kinds of things, it would follow suite that I post more than crochet, so I want to.
Now, gettin' myself to work!

Monday, March 29, 2010

Onigiri!

Onirigi purse by you.
Tasty and delicious, now in purse form!
Recently, right before the local anime and manga convention (aka, when I'm going psycho either trying to finish art or costumes), my friend and I were chatting about a bento we were going to work on. I never ended up getting to make mine, but I figure this counts.
I told her, a fellow crocheter, she should make an onigiri bag. She refused!
So I picked up yarn and whipped this up for her instead XD

The strap turned out longer than I would've liked, but oh well. It's got a little metal ring (the keychain sort) on either side to separate the strap from the onigiri bag itself. The bag was crocheted in one solid piece, with the nori (black seaweed) separate and sewn on, along with the umeboshi (red pickled plum). I personally love the umeboshi; it's cute AND functional, since it serves as a sort of nob for the loop to hold the bag closed. The purse is small already so it didn't seem like that big of a deal, but it helps. I made it have sort of a ledge thing but if I made it again, I would make it more defined to it retains the tension on the loop better. Ah, listen to me rant.
Inside Onigiri Purse by you.
The inside, lined with fleece. Not really SUPER necessary, it's already a small bag, but it made it look more finished and put together. Also provides security XD

My dad insisited on "modeling" it haha. It's really not that big, but just big enough to be cute XD

On the home front, I'm still busy with school and work among other things, but I try to crochet when I can. Here's to more yarnage!
(I have no idea wtf that means.)

Wednesday, January 27, 2010

Completed Jacket!

It's done it's done it's dooooone*hearts* For the past... two months, ish, (less?) I've been working on the Curried Cable Jacket from the fall issue of last years' Interweave Crochet magazine.
Pretty na? Now my didn't turn out exactly the same, but that's just fine I suppose haha. I used a darker wool, and made it a larger size than strictly necessary to allow for shrinkage since we live in snow. It's bound to happen. Let's see... this is maybe the second or third pattern for crochet I've ever followed. :/ Am I a rebel? Guess I just don't like to follow patterns very much if I can figure it out on my own.

Pros: learned cabeling, a new form of ribbing, made my largest project and first nonhat nonmitten wearable crochet item :3
Cons: zipperrrrrr. It wouldn't behave despite ripping that thing out two or three times. The crochet fabric kept stretching out despite my best efforts and resulting in sort of a ... bubbled look. The zipper cover helps a bit though.


All in all, this project was super fun, and my sister really liked it which of course was my primary focus. :D


On the project list is the crochet blocks crochet-along, an ami that's been sitting here for three months ALMOST complete (poor guy! er gal. er guy. not sure yet.) and a few other things that I just...plan to do. Also my Free Spirit doll.

I made some mittens for a friend of mine but failed to take pictures before I gave them to her, so I'll ask her to do that X3

Thursday, December 17, 2009

WIPs, Christmas, and a Crochet-along!

Last year with some Christmas money, I bought myself a wonderful crochet book called "200 Crochet Blocks" by Jan Eaton. I must tell you, I LOVE this book! I don't buy books on any sort of craft very often (I rely on the Internet, the Library, and my own trial and error usually), however this book is simply one of the best I've read.

Her designs are really great, and she provides a ton of a helpful suggestions with colour, arrangement, matching blocks, and other things like specific stitches and such.

This brings me to the Crochet-along Let's Make 7, wherein you crochet 7 specified blocks before the end of January! Should I start another project with all the things (including PRESENTS) that I have going on? Probably not.
Am I going to anyways? You betcher hook.
Here's where the info is at. If you can get this book and want to just crochet some fun blocks to use for a cushion or later on, a blanket, go for it!
The Flickr group is here:


Speaking of Christmas presents, boy do I get myself into things (see above). I really enjoy it though, so I guess that's okay.
I'm only crocheting a few presents total; one isn't even if or Christmas! It's for my sister's birthday which falls four days after (she usually gets hers combined :< ). At the risk of my hard work going to naught for her finding out, I won't say it just yet, but rather say it's in the fall issue of Interweave Crochet magazine.

And WIPs! Many of them! Let's see, so far I'm working on a Free Spirit doll, from the pattern by the most excellent Beth of By Hook, By Hand. That's been in the works for... months, actually. *ashamed*
There's Kamden's Elephant, who is 85% completed. I'm still working on the ears, they're giving me trouble. I don't like anything I've come up with thus far. However after that, he should be done quickly! The initial purpose of the design was to make a stuffed elephant for a friend's new nephew.
During this summer (yes! The SUMMER) I made a fox design that I was really rather attached to, and even went so far as to start making a duplicate to test the pattern but... well you know the story. It's on my list!

Here I dig myself all these crafty holes, yet somehow, I enjoy it :/ <3

Friday, November 27, 2009

Happy Thanksgiving!

A bit late, but my sentiment's there!

Having mentioned that, I thought I would also mention something else non-crochet related.
(Except in the case of my previous project, the crocheted Murloc Murky.)
The Murlocs, they are dying. If you've ever played World of Warcraft, if you've ever quested around Azeroth, seen them murdered... well, then you know these noble creatures are in danger.

Won't you please help?
http://savethemurlocs.org/

... This inspires me to work on my Murky some more, and refine that pattern. Ah, to add to the list!

Monday, November 23, 2009

I'm still sick x_x I think, oddly enough, this is related to dentist work I had done less than a week before all this started...
I KNEW they were no good!
More later, as I'm working on a new friend<3

Oh, and there's a long needed update on my Awesome-peeps list!

Sunday, November 8, 2009

Pleh!

Once a week! Once a week.

I'm sick :( It's not so fun. It's amazing, really, they don't even know what I have, so for the time being I'm to stay home. Going back to the doctor Monday though. At least I get some time off and can crochet a little!
I have been keeping busy, haha. For Halloween, we all went as pirates! We stormed the bowling alley and Village Inn, h'yarr. For the fiancee, I made a lush velveteen pirate coat; it's very nice, I think. Not quite done though since I didn't have time aforehand to do the buttons, but I'm GONNA finish it, and I'll post pics when I do.
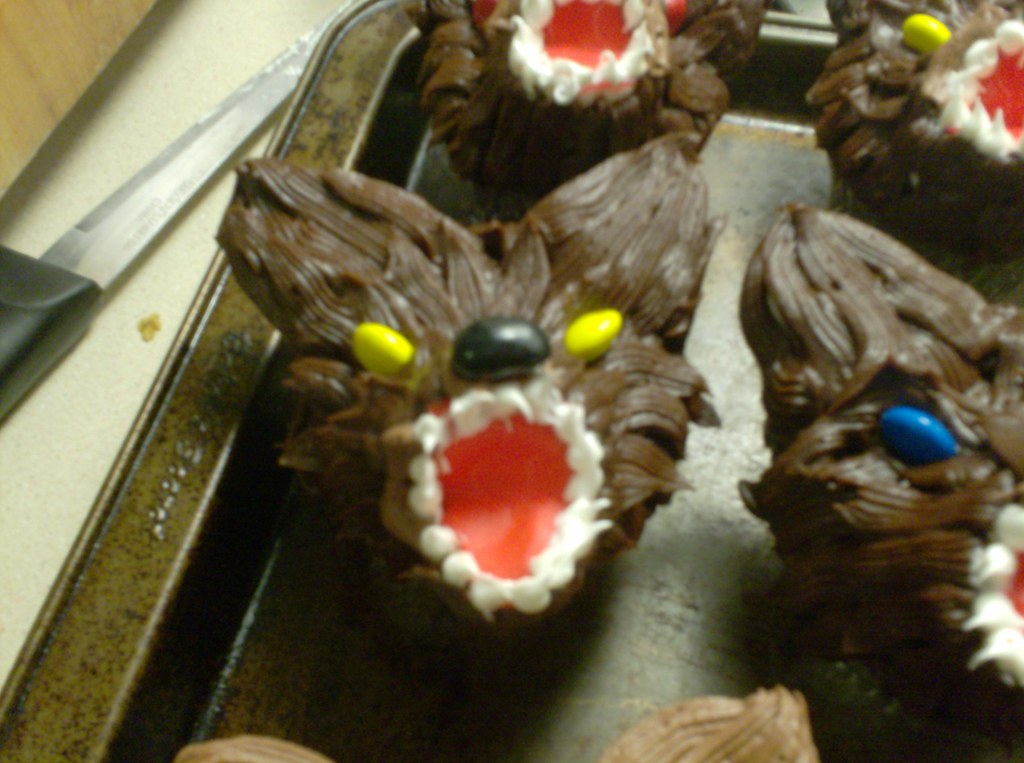
For my friend who was just deployed, I made these:


He likes werewolves so I thought they'd make a good choice haha. Also they were related to a gaming session I've been running, so that's part of it.
He liked them :3 I got them from the book Hello, Cupcake! which is downright fantastic. I DEFINITELY suggest you take a look at it, even if you don't think you can cook cupcakes (which I certainly can't very well)!
The designs are just too awesome, and I can't wait to make more! There's also really helpful tips in there.
My sister already wants me to make her penguin cupcakes for her birthday, haha.

On the crochet front, I'm working on a few different things. I made myself a pair of oversized mittens so that I can line them with fleece, nice and warm! Also working on a massive blanket with my friend Angela, and some things for a baby on the way in her family.

And, we got our first snow today! It took forever, I'll tell you what. We actually didn't have snow Halloween night, which is a first as far as my memory goes.
But now it's here!
When I'm not coughing up a lung, I'm gonna go outside to play in it with the dog<3
Though that probably won't be for a long while yet...

Wednesday, September 9, 2009

Knot tutorial and Elvis


This year at the Fair, I bought myself a tiger marionette. There's a lady who sells them made out of pom poms, and they're so fluffy and cute... I fell in love with him right away.
His name is Elvis, due to a humorous thing with a friend of mine just beforehand (she got herself a Hippo marionette as well and named him Presley).


It's so hard to not play with him, whenever I look at him I wanna make him dance around! Or climb things or hold things or shake hands...
My dogs really aren't quite sure what to make of him.

Also, I was asked by someone to clarify how I tie the knots when using yarn scraps for the ScrapCats, so I made a little tutorial. I hope it helps anyone who needs it! You can find the large version here.

And now, to go and try hard not to get distracted by crochet. For I have a Japanese test tomorrow, and really need to study! XD

Saturday, September 5, 2009

ScrapCat! Free pattern


Yay! I finally finished writing up my first pattern! Whew, translating even a simple pattern from Claire-crochet-shorthand babble to a sensible plan is tedious work. Hopefully with time it'll get faster. Does that mean I should make more patterns?

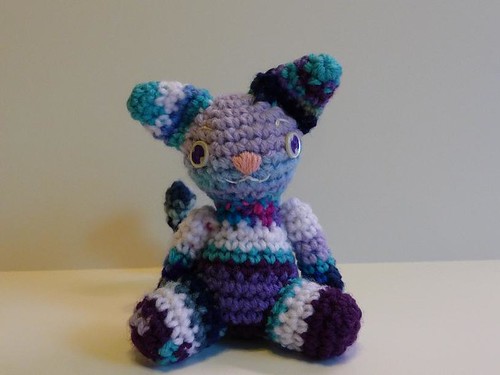
I got the idea, out of boredom, a while back to use up some of my basketful of yarn scraps and make it into a colourful Ami, which produced ScrapCat! The first one was Pheobe.

She's watching me from above my computer. Along with Groucho, the second Cat I made (So named for his abnormal dark eyebrows)
The rest are on my Flickr page, http://www.flickr.com/photos/carouselcute/

Their messy look just makes them cuter, I think. Each one is different thanks to different scraps used to make them, so their unique personalities can be endless.

If you find any errors or run into any problems, I'd be happy if you commented or emailed me. This is the first one I've ever written up for other people to follow, so I hope I did a good job!

Here you go!

***
Scrap Cat Pattern

A free pattern to make, with love!

This pattern is free for making, giving, sharing, selling the products of, etc. I only ask that you let me know when you sell things from it, and don't claim it as your own.

MATERIALS:

G hook (H can work, but G is better for tightness)
Worsted weight yarn scraps. A good three handfuls, each scrap 5 inches or more is allright. You can use non-scrap yarn, too. That's just an approximation, so don't be afraid to use other yarn you may have.
Polyfil*
Embroidery floss
Needle (and yarn needle, obviously)
Pipecleaner (optional)
2 buttons for the eyes. Or use your respective eyes. I like buttons for them because it suits the scrappy feel.

*If you REALLY want to be thrifty, just stuff it with more scraps!
TERMS

ch-chain
st-stitch
sc-single crochet
inc-increase (2 single crochet in one sitch)
dec-decrease (single crochet 2 stitches together) (invisible decrease is best, and easy to learn with tutorials online. Planet June and Gourmet Amigurumi have good ones.)

BEFORE YOU START.

There should be a good two to three handfuls of scraps. Anything longer than 5 inches is allright. Note that shorter scraps will only show a few stitches, and longer ones will show much more. To obtain the "scrap yarn", take two strands and place them end to end, and tie a 2-strand overhand knot as close as possible to the ends (leaving a little bit of tail). Pull tight to make sure it won't slip out. Repeat as you go so that your scraps form yarn just enough length to work with. Remember to leave a good amount for sewing the piece to the body! A longer piece there is best.
The knots won't show through your crochet. If, when you make a stitch, they're showing on that side, tighten it or pop it through to the other side. Undoing the stitch and making it again only tighter can solve the problem too.
I realize this might be kind of a weird way to work, so if there's any problems or you have any trouble, just email me and I'll be happy to help!

PATTERN
This is worked as Amigurumi. Do not join rounds, work in a spiral instead. You don't have to do it in this order, but I make notes along the way as to assembly, so it's probably a good idea. It's also easier to do some things before others.
Have fun!

HEAD

Make a magic ring with 6 stitches. (or CH2, and make 6sc in first ch if you don't know the magic ring technique)

r1: inc in each st (12)
r2: *1 sc in next st, inc in next st. repeat from * around (18)
r3: *1 sc in next 2 st, inc in next st. repeat from * around (24)
r4: sc in each st. (24)
r5-7: repeat r4. (24)
r8: *1 sc in next 2 st, 1 dec. repeat from * around (18)
r9: *1sc in next st, 1 dec. repeat from * around (12)

Fasten off and pull tail inside the head.
Stuff well.

FACE

Using embroidery floss, sew an upside down triangular nose and mouth onto the middle of the face. Sew the buttons on for the eyes along the same line as the nose. Using the same colour floss as for the mouth, sew semicircle eyebrows.
*a note about the eyes:
I loved the buttons but didn't like the way they looked in the end with the thread I sewed them on with. So I took fabric paint (also known as puffypaint, great stuff) and filled in the buttons, with white dots for the shine. You don't have to, it's just something I felt like doing.


EARS (make 2)

Magic ring with 6 st.

r1: 1 sc in each st. (6)
r2: *1 sc in next st, inc. repeat around. (9)
r3: 1 sc in each st. (9)
r4: *1 sc in next 2 st, inc. repeat from * around, (12)
(If you want longer, tall ears, do one more round of sc in each st, for a total of 12 sc)

Fasten off and leave long tails for sewing.

If you want, choose a solid colour for both ears (make sure you have enough!) and sew it onto one side of each ear, to make the inner ear colour.
Fold them flat and sew the ears onto the top of the head, bending the sides in slightly to create a concave effect.

BODY

Magic ring with 6 st.

r1: inc in each st (12)
r2: *1 sc in next st, inc in next st. repeat from * around (18)
r3: *1 sc in next 2 st, inc in next st. repeat from * around (24)
r4: sc in each st. (24)
r5: repeat r4.
r6: *1 sc in next 2 st, 1 dec. repeat from * around (18)
r7: sc in each st (18)
r8: repeat r7.
r9: *1sc in next st, 1 dec. repeat from * around (12)
r10: sc in each st (12)
r11: repeat r10.

Fasten off with long tail.

TAIL

Magic ring with 6 st.

r1: sc in each st (6)
r2-4: repeat r1.
r5: dec, sc in remaining 4 st (5)
r6: sc in each st (5)
r7-15: repeat r6.

Fasten off. Fold pipecleaner in half and push the folded end into the tail. There should be some still outside of the tail. Place the tail at the base of the body (where, when sitting, it will be sticking outward) and push the remaining end into the body and fold one end one way and the other end the opposite way, to anchor the pipecleaner in place.
Sew the tail onto the body.

Stuff the body completely, adding a penny or two to the bottom for weight, if desired (not necessary).
Now, sew the body to the head, making sure that you fasten it to where the tail is behind (and when looking down on it, between) the two ears.

ARMS (make 2)

Magic ring with 6 st.

r1: sc in each st. (6)
r2-9: repeat r1.
(this is when a stitch marker really comes in handy. You can use a paperclip or hook earring if you don't have one.)

Stuff.
Sew the opening closed by fastening off with a long tail, and threading the tail through the outer loop of each stitch and pulling closed.

LEGS (make 2)

Magic ring with 6 st.

r1: inc in each st (12)
r2: sc in each st (12)
r3-6: repeat r2

Fasten off and stuff.

Sew to the body, each leg at an angle towards the front (not directly below the ears, but angled inward). Make sure it's at the base, same as the tail, so your ScrapCat can sit without falling over.

Sew the arms onto the body just below the neck.
For a Maneki ScrapCat (the raise-paw good luck cat), Sew the left arm on upwards. You can sew the paw down in a beckoning motion, and tack on a bell or fake coin as well.


That's all! It's finished! I hope you enjoyed this pattern and had fun with it!

If you have any questions, comments, or want to share your ScrapCat, just let me know!

Thursday, August 27, 2009

Our State Fair is a great state fair~


*hums showtunes*
So much! In the next two weeks, so busy!
I've started school, so that's part of it. My schedule at work changed two times in the past week, and it'll change again soon. It's confusing, because I have two schedules to remember; they change every other week due to mandated furlough.
Then, the state fair! The Alaska State Fair is the biggest event of the year, there's so much to do! I'm going up both this weekend and next.
Friends have been coming here and back from their various schools too, and that's been fun.
But even then, I've found time to crochet! I'll post as soon as I can take pictures (one piece I've had for a few weeks or more -_-;; I need to try harder at the whole "taking pictures quickly" thing! Perseverance, fortitude...), including a pattern for everyone!
A major update before another lull? I hope not.

Monday, August 10, 2009

Should've posted this a while ago...

I finished this a good month or two ago, actually, but was reluctant to put her up because I wanted to fix a few things, take better pictures... I let time get away from me! I really should be more pressing when it comes to things like this or it'll just fall off my list of things to do haha.
Since a kid I've been in love with horses (which I guess most every girl is at some point? Or so I'm told) and always wanted to make an Amigurumi horse. But not just any cute horse.
I love the ones that are pudgy or simplified, but I didn't want that to be me for this. It was way more of a challenge for me to try and make it stand and look like a horse with the same proportions.
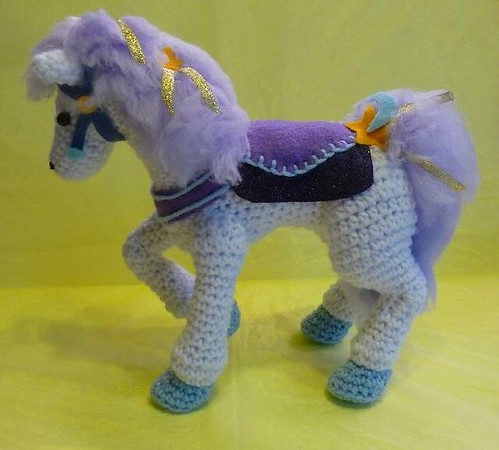
Ah! But I'm being wordy. Here's Ceres, my first (of MANY I assure you!) Amigurumi horse!


I really put a lot of effort into shaping her legs and body, though the body needs a LOT of work and the legs are a bit wonky. Standing was alright before the saddle and stuff, but after that it got too heavy. I bought some white pipecleaners to use in the next one to give added support. They're surprisingly sturdy on their own, though...
Her back legs aren't joined to the body, but rather the back legs form the thighs, which join to each other, and then the body stops at the stomach and is joined there. Can you tell?

The mane and tail were fun :3 I used the fluff technique that I've fallen in love with (it makes things so FUZZY CUTE!).
Not very happy with her saddle and accoutrements, but that's okay. In case you're wondering what the yellow things are, I put felt stars (and a moon on her tail) and gold ribbon throughout her hair. Ceres is the dwarf planet near Earth.

So as not to fill up the page with pics, there's more at my Flickr stream including detailed pics of her legs.

I've done a few more things since then, believe it or not. Here's to a resolution (in the middle of the year, what?) to being more prompt about things!

Wednesday, June 24, 2009

OMG.


Guys! My Amigurumi Murloc got featured in fandomania.com's Fandomestic World of War-Crafts list!
Oh I'm so happy, he's one of the first real challenging things I ever tried to crochet, and I was rather please with how he came out. I'm super glad other WoW-fans like him too :3

Go check out the list, there are some wicked awesome crafts there!